热土豆1号

浅谈Android逆向与加固

本文涉及内容的源码地址:https://github.com/minyangcheng/JiaGuSample

破解一个app

步骤一:脱壳

脱壳简单来讲其实就是获取app dex文件(应用源码编译的结果都被放在dex文件里面),我这里介绍下以下两个简便的方法,基本上能成功脱壳市场上80%的应用,这次公司业务需要破解的应用,用方法二都能成功脱壳。当然你也可以用ZjDroid、DexHunter等工具。

脱壳方法一

原理:Android4.4以上开始使用ART虚拟机,在此之前我们一直使用的Dalvik虚拟机,ART虚拟机需要用dex2oat将未加密的dex数据编译成oat,那么加固的壳一般都会在dex2oat的之前进行dex解密,因此通过修改dex2oat的代码,在其中插入一段将解密后的dex写出来的代码,即可dump出解密后的dex。

  1. 一个android4.4系统虚拟机
  2. 修改代码后的dex2oat(用于替换/system/bin/dex2oat位置的文件)
  3. 在开发者工具里面将运行环境选择为:ART运行模式
  4. 重启虚拟机,安装app,启动app
脱壳方法二

原理:android中的java.lang.Class类拥有一个方法public native Dex getDex();,这意味着我们能通过Class对象的getDex方法获取到Dex对象,Dex类中有一个方法public byte[] getBytes(),我们能通过此方法获取获取该class对象关联的dex数据。这里采用的是Xposed去hook应用的ClassLoader.loadClass方法区dump解密后的dex数据。

  1. 一个root过的手机,系统要求在4.4到6.0之间
  2. 安装xposed:该工具的原理是修改系统文件,替换了/system/bin/app_process可执行文件,在启动Zygote时加载额外的jar文件(/data/data/de.robv.android.xposed.installer/bin/XposedBridge.jar),并执行一些初始化操作(执行XposedBridge的main方法)。然后我们就可以在这个Zygote上下文中进行某些hook操作。
  3. 安装dumpdex:自己写的一个可以脱壳的app,实际上是一个xposed模块
  4. 安装需要脱壳的app
  5. 重启手机,启动app

步骤二:从dex文件和apk文件中获取app代码和资源

将脱壳后的dex和源app放在一个统一目录下,运行以下脚本,获取app源码和资源。

该脚本其实是调用jadx工具来实现反编译,然后用Intellij打开生成的dist目录,将sources标记为sources root,将resources标记为resources root,即可开始分析应用的代码。当然你也可以用Source Insight等工具进行源码分析。

1
2
3
4
5
6
7
8
9
10
11
12
13
14
15
16
17
18
19
20
21
22
23
24
25
26
27
28
29
30
31
32
33
34
35
36
37
38
39
40
41
42
public class ReCompileCode {
public static void main(String[] args) {
try {
if (args == null && args.length == 0) {
System.out.println("请传递dex目录文件夹");
return;
}
File dexDirFile = new File(args[0]);
if (!dexDirFile.exists()) {
System.out.println("dex目录文件夹不存在");
return;
}
File distDirFile = new File(dexDirFile, "dist");
if (!distDirFile.exists()) {
distDirFile.mkdirs();
}
File[] dexFileArr = dexDirFile.listFiles(new FileFilter() {
@Override
public boolean accept(File file) {
return file.getName().endsWith(".dex") || file.getName().endsWith(".apk");
}
});
Process process = null;
String s = null;
System.out.println("......开始解析......");
for (File dexFile : dexFileArr) {
String cmd = "jadx -d " + distDirFile.getAbsolutePath() + " " + dexFile.getAbsolutePath();
process = Runtime.getRuntime().exec(cmd);
BufferedReader bufferedReader = new BufferedReader(new InputStreamReader(process.getInputStream()));
while ((s = bufferedReader.readLine()) != null) {
}
process.waitFor();
System.out.println(dexFile.getAbsolutePath() + "...解析完成... code=" + process.exitValue());
}
System.out.println("......解析结束......");
} catch (Exception e) {
e.printStackTrace();
}
}
}

步骤三:动态分析

如果你是为了爬取app的数据,就去针对app的网络请求层进行分析,通过分析得出这个app的请求网络传输参数和加密逻辑,然后你可以通过xposed在关键方法上设置一个切面,甚至你可以直接将app的网络加解密代码提取出来,通过接口请求去爬去数据。
如果你是为了用app的某个收费功能,就去该功能页面的入口处,寻找判断该收费能否使用的代码,然后通过xposed直接hook掉判断逻辑即可。

这里推荐一个动态分析工具Inspeckage,它是一个基于Xposed开发的一款应用,核心功能有监控Shared Preferences数、加密、哈希、SQLite、HTTP、WebView数据,还能动态添加新钩子。

步骤四:hook掉关键的方法

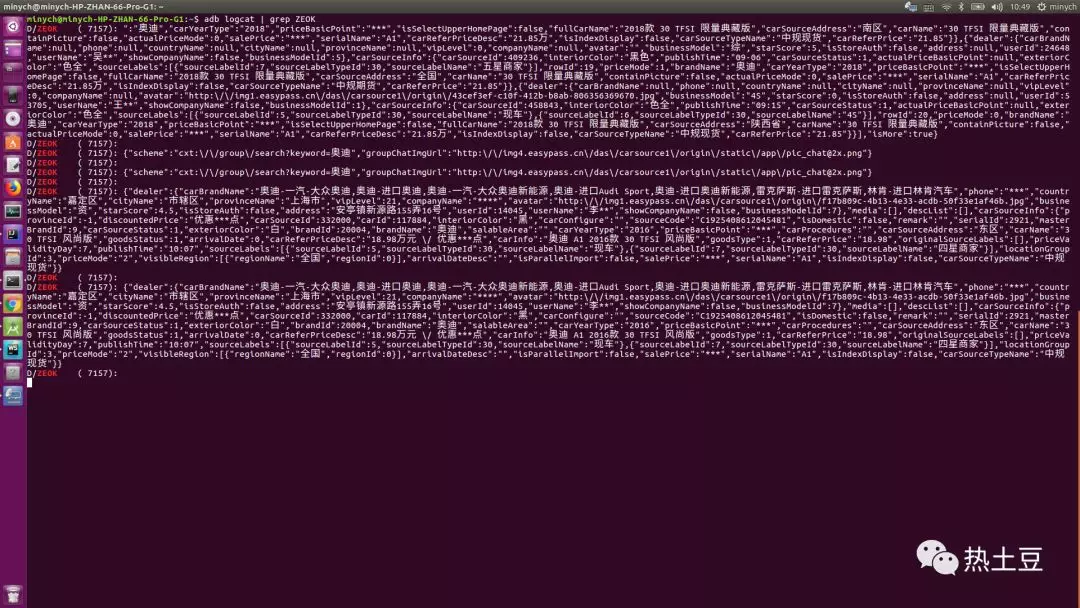
写一个xposed模块直接hook找到的关键方法,我这里发现该app在数据返回的时候总会去调用com.easypass.carstong.protocol.bean.ResultBean.getData

1
2
3
4
5
6
7
8
9
10
11
12
13
14
15
16
17
18
19
20
21
22
23
24
25
26
public class CheXiaoTongHook extends BaseHook {
public CheXiaoTongHook() {
super("com.easypass.carstong", "com.easypass.carstong.protocol.bean.ResultBean");
}
@Override
public void handleLoadPackage(Class clazz) throws Exception {
XposedHelpers.findAndHookMethod(clazz, "getData", new XC_MethodHook() {
@Override
protected void afterHookedMethod(MethodHookParam param) throws Throwable {
Object response = param.getResult();
if (response != null) {
JSONObject jsonObject = new JSONObject();
jsonObject.put("packageName", packageName);
jsonObject.put("activityName", getCurrentActivityName());
jsonObject.put("responseData", response);
String content = jsonObject.toString();
Logger.d(TAG, response + "\n\n");
FileLogger.log(content);
}
}
});
}
}

最后我们就能查看接口数据的返回:

了解app加固

对app进行加固,可以有效防止移动应用被破解、盗版、二次打包、注入、反编译等,保障程序的安全性、稳定性。加固技术这几年也是不断在迭代,各厂商所采用的技术也不一样。

  1. 360基本上是把原始的dex加密存在了一个so中,加载之前解密
  2. 阿里把一些class_data_item和code_item拆出去了,打开dex时会修复之间的关系,同时一些annotation_off是无效的的来防止静态解析
  3. 百度是把一些class_data_item拆走了,与阿里很像,同时它还会抹去dex文件的头部;它也会选择个别方法重新包装,达到调用前还原,调用后抹去的效果
  4. 梆梆和爱加密与360的做法很像,梆梆把一堆read,write,mmap等libc函数hook了,防止读取相关dex的区域,爱加密的字符串会变,但是只是文件名变目录不变
  5. 腾讯针对于被保护的类或方法造了一个假的class_data_item,不包含被保护的内容。真正的class_data_item会在运行的时候释放并连接上去,但是code_item却始终存在于dex文件里,它用无效数据填充annotation_off和debug_info_off来实现干扰反编译

实现一个简单加固

前置知识

  • 类加载

类加载采用的是ClassLoader子类完成,具体作用是将class文件按需加载在VM虚拟机中,加载过程采用的是双亲委托来完成。

java中的类加载器:

ClassLoader 作用
BootStrapClassLoader 加载sun.boot.class.path环境属性下的jar或class文件,C++编写
ExtClassLoader 加载java.ext.dirs环境属性下的jar或class文件,父加载器为:BootStrapClassLoader
AppClassLoader 加载java.class.path环境属性下的jar或class文件,父加载器为:ExtClassLoader

android中的类加载器:

ClassLoader 作用
BootStrapClassLoader Android系统启动的时候被创建,加载一些Android系统框架类
PathClassLoader 加载一些系统类以及应用程序类,父加载器为:BootStrapClassLoader
DexClassLoader 加载jar、apk、dex文件,父加载器可以根据需求设置

  • dex文件格式

dex文件的基本结构:

010Editor查看dex文件(数据区data不展示):

上面两张图片展示了dex文件的基本结构和一些数据块基本含义。具体每个数据块的作用和含义,请自行查看官方文档或谷歌搜索。
我们这里需要用的有:

  1. checksum: 文件校验码,使用 alder32 算法校验文件除去 maigc、checksum 外余下的所有文件区域,用于检 查文件错误。
  2. signature: 使用 SHA-1 算法 hash 除去 magic、checksum 和 signature 外余下的所有文件区域, 用于唯一识别本文件 。
  3. file_size: dex 文件大小

实现思路

源应用、壳应用、加固脚本:

  • 被加固的应用称为源应用
  • 解密并加载源应用的应用称为壳应用。壳应用中有个自定义的Application类,该类主要作用是解密源应用,创建DexClassLoader,在运行的时候替换默认的ClassLoader,重建application实例
1
2
3
4
5
6
7
8
9
10
11
12
13
14
15
16
17
18
19
20
21
22
23
24
25
26
27
28
29
30
31
32
33
34
35
36
37
38
39
40
41
42
43
44
45
46
47
48
49
50
51
52
53
54
55
56
57
58
59
60
61
62
63
64
65
66
67
68
69
70
71
72
73
74
75
76
77
78
79
80
81
82
83
84
85
86
87
88
89
90
91
92
93
94
95
96
97
98
99
100
101
102
//替换调默认的classloader
@Override
protected void attachBaseContext(Context base) {
super.attachBaseContext(base);
try {
File odex = this.getDir("payload_odex", MODE_PRIVATE);
File libs = this.getDir("payload_lib", MODE_PRIVATE);
odexPath = odex.getAbsolutePath();
libPath = libs.getAbsolutePath();
apkFileName = odex.getAbsolutePath() + "/source.apk";
File dexFile = new File(apkFileName);
if (!dexFile.exists()) {
dexFile.createNewFile();
byte[] dexdata = this.readDexFileFromApk();
this.splitPayLoadFromDex(dexdata);
}
....
DexClassLoader dLoader = new DexClassLoader(apkFileName, odexPath,
libPath, base.getClassLoader());
RefInvoke.setFieldOjbect("android.app.LoadedApk", "mClassLoader", loadApk, dLoader);
} catch (Exception e) {
e.printStackTrace();
}
}
//重建application,保证源应用中的自定义application生命周期能够正常被调用
@SuppressLint("MissingSuperCall")
@Override
public void onCreate() {
// 填写源应用的application全量类路径
String appClassName = "com.min.source.App";
Object currentActivityThread = RefInvoke.invokeStaticMethod(
"android.app.ActivityThread", "currentActivityThread",
new Class[]{}, new Object[]{});
Object mBoundApplication = RefInvoke.getFieldOjbect(
"android.app.ActivityThread", currentActivityThread,
"mBoundApplication");
....
Application app = (Application) RefInvoke.invokeMethod(
"android.app.LoadedApk", "makeApplication", loadedApkInfo,
new Class[]{boolean.class, Instrumentation.class},
new Object[]{false, null});// 执行
RefInvoke.setFieldOjbect("android.app.ActivityThread",
"mInitialApplication", currentActivityThread, app);
....
app.onCreate();
}
//从壳应用dex文件中抽取出
private void splitPayLoadFromDex(byte[] data) throws IOException {
byte[] apkdata = data;
int ablen = apkdata.length;
byte[] dexlen = new byte[4];
System.arraycopy(apkdata, ablen - 4, dexlen, 0, 4);
ByteArrayInputStream bais = new ByteArrayInputStream(dexlen);
DataInputStream in = new DataInputStream(bais);
int readInt = in.readInt();
System.out.println(Integer.toHexString(readInt));
byte[] newdex = new byte[readInt];
System.arraycopy(apkdata, ablen - 4 - readInt, newdex, 0, readInt);
newdex = decrypt(newdex);
File file = new File(apkFileName);
try {
FileOutputStream localFileOutputStream = new FileOutputStream(file);
localFileOutputStream.write(newdex);
localFileOutputStream.close();
} catch (IOException localIOException) {
throw new RuntimeException(localIOException);
}
}
//从壳应用安装的apk中获取其classes.dex文件
private byte[] readDexFileFromApk() throws IOException {
ByteArrayOutputStream dexByteArrayOutputStream = new ByteArrayOutputStream();
ZipInputStream localZipInputStream = new ZipInputStream(
new BufferedInputStream(new FileInputStream(
this.getApplicationInfo().sourceDir)));
while (true) {
ZipEntry localZipEntry = localZipInputStream.getNextEntry();
if (localZipEntry == null) {
localZipInputStream.close();
break;
}
if (localZipEntry.getName().equals("classes.dex")) {
byte[] arrayOfByte = new byte[1024];
while (true) {
int i = localZipInputStream.read(arrayOfByte);
if (i == -1)
break;
dexByteArrayOutputStream.write(arrayOfByte, 0, i);
}
}
localZipInputStream.closeEntry();
}
localZipInputStream.close();
return dexByteArrayOutputStream.toByteArray();
}
  • 加固java脚本:将源应用apk文件二进制流写入壳应用classes.dex末尾,并修改dex文件的检验码、签名、文件大小
1
2
3
4
5
6
7
8
9
10
11
12
13
14
15
16
17
18
19
20
21
22
23
24
25
26
27
28
29
30
File apkFile = new File(sourceApkPath);
File shellDexFile = new File(shellDexPath);
...
byte[] apkByteArray = encrypt(readFileBytes(apkFile));
byte[] shellDexArray = readFileBytes(shellDexFile);
int apkByteArrayLen = apkByteArray.length;
int shellDexLen = shellDexArray.length;
int totalLen = apkByteArrayLen + shellDexLen + 4;
byte[] newDex = new byte[totalLen];
// 添加壳应用数据
System.arraycopy(shellDexArray, 0, newDex, 0, shellDexLen);
// 添加源应用数据
System.arraycopy(apkByteArray, 0, newDex, shellDexLen, apkByteArrayLen);
// 添加源应用数据长度
System.arraycopy(intToByte(apkByteArrayLen), 0, newDex, totalLen - 4, 4);
// 修改DEX file size文件头
fixFileSizeHeader(newDex);
// 修改DEX SHA1 文件头
fixSHA1Header(newDex);
// 修改DEX CheckSum文件头
fixCheckSumHeader(newDex);
// 把内容写到 newDexFile
File file = new File(newDexFile);
if (!file.exists()) {
file.createNewFile();
}
FileOutputStream localFileOutputStream = new FileOutputStream(newDexFile);
localFileOutputStream.write(newDex);
localFileOutputStream.flush();
localFileOutputStream.close();

手动加固步骤(参考此步骤就能对app进行简单加固,实际上这就是最早期的加固操作原理):

  1. 解压壳应用和源应用apk文件
  2. 将源应用中的res、resources.arsc、assets、AndroidManifest.xml文件拷贝替换到壳应用中
  3. 将AndroidManifest.xml中application节点的属性android:name修改为壳应用中Application类的类路径
  4. 将源应用apk文件的二进制字节流加密后,写入到壳应用的classes.dex末尾
  5. 将壳应用目录压缩为zip包,重命名为unsign.apk
  6. 签名jarsigner -verbose -keystore minych.jks -storepass 123456 -signedjar signed.apk unsign.apk minych